Yoga poses to make your skin wrinkle free are almost miraculous. It happens to be the answer of many celebrities and even common people’s secret of flawless skin.
Yoga for beautiful skin functions by working on your body, mind and soul. Yoga helps to improve blood circulation which then provides your skin cells the nutrients it needs along with getting your body rid of the toxins. It also beautifies your skin by making it acne free and minimizing the dullness.
Every yoga pose comes with myriads of benefits and not just revitalizing your skin. Here are some yoga poses that will help you attain and maintain beautiful wrinkle free skin.
10. Lotus pose or Padmasana
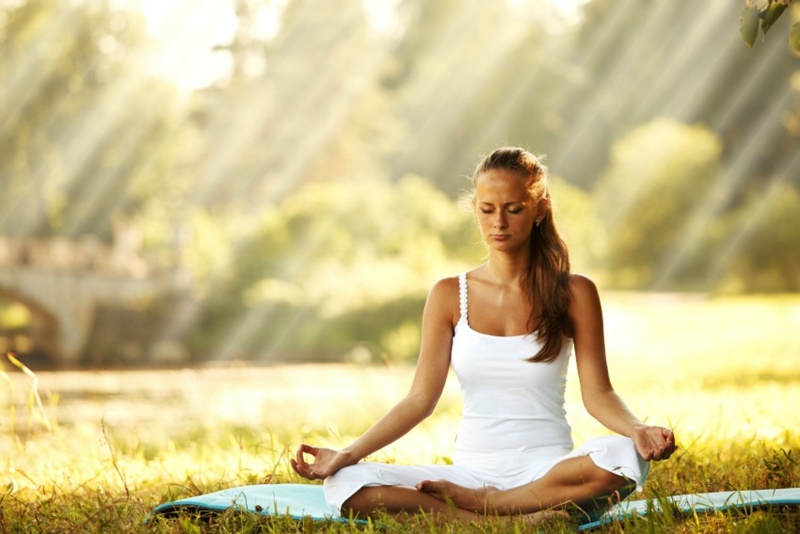
Lotus pose is the most basic yoga pose which requires you to cross your legs and uncross all your mental strings by doing some meditation to relax your mind. Upon doing this regularly, you are bound to blossom like lotus by relaxing your mind and releasing muscular tension. In effect, it will give you a glowing skin.
Step by step to lotus pose
- Simply sit on your mat, stretch your legs and keep your spine erect.
- Bend your left leg and keep your right foot on your left thigh.
- Now do the same thing with your right leg.
- Keep your hands on your knees and your head straight.
- Your spine needs to remain erect throughout.
- Remain in this pose and take 100 deep breaths.
Warning
Take an expert advice from a professional yogi if you have pain in your ankles or any knee issues.
9. Bow pose or Dhanurasana
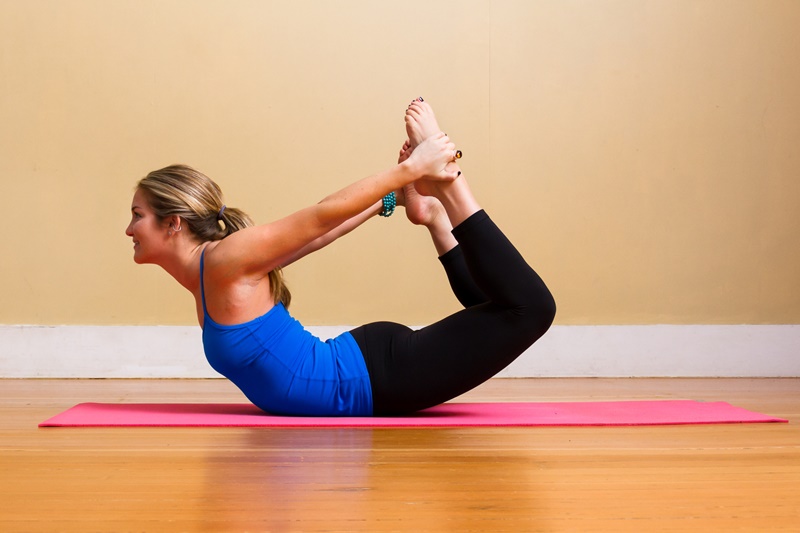
This pose is called a bow pose for a reason. This pose will literally turn you into a bow. This is a highly effective yoga for beautiful skin. It takes into account your entire body and improves blood circulation. This position puts a little stress on your abdomen getting rid of all the toxins. It is also perfect for bursting the stress balloons in you and you are bound to see a revitalized skin complexion immediately.
Step by step to Bow Pose
- Lie down on your stomach with your arms beside your body and feet apart.
- Bend your legs on the inside and try to get hold of your ankles in a manner that your body’s weight goes to your abdomen.
- Keep your head straight and look ahead. You need to keep your facial muscles relaxed and smiling is a good idea for that.
- Your entire focus should be on breathing.
- Remain in this position for 20 seconds and when returning to original position, exhale.
Warning
If you happen to be a patient of blood pressure whether low or high, it is best not to go for this pose. In addition to this, in case of back or head pain, neck injuries, or a history of hernia, simply don’t do this. Pregnant ladies or ladies with abdominal surgery shouldn’t practice this yoga pose.
8. Fish Pose or Matsyasana
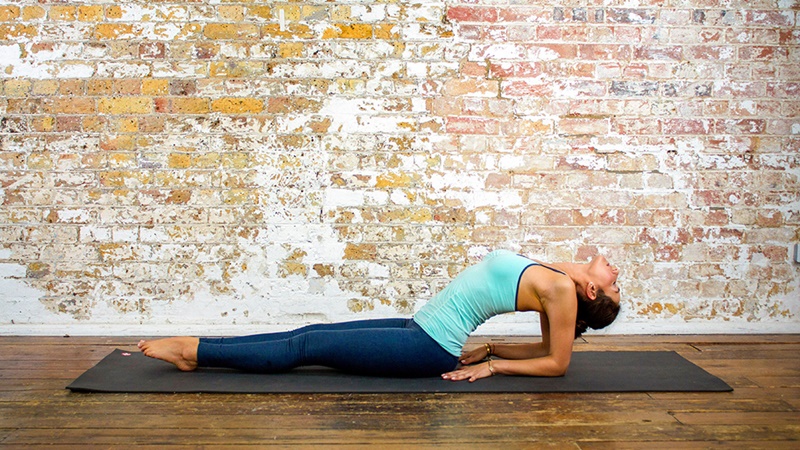
Fish pose allows you to tone down the muscles of your face and even the throat. It helps to make your skin firm and smooth along with keeping the function of pineal, thyroid and pituitary glands to its optimum which is often the reason for your adverse skin conditions.
Step by step to fish pose
- Simply lie down on your back, keep your feet together and keep your hands beside the body.
- Put your hands below the hips with your palms facing downwards.
- Inhale and lift up your chest and head.
- While keeping your chest lifted, move your head backwards till it touches the floor.
- When your head slightly touches the floor, make sure you focus the weight on the elbow rather than the head.
- Put the force exerted by the leg and thighs towards the floor.
- Remain in this pose as long as it is easily possible for you.
- Inhale and exhale deeply while you are in this pose.
- Then gently come back to your original position by bringing the chest and head down on the floor.
Warning
People suffering from high or low blood pressure, migraine, insomnia or back and neck problems should not perform this pose.
7. Plow pose or Halasana
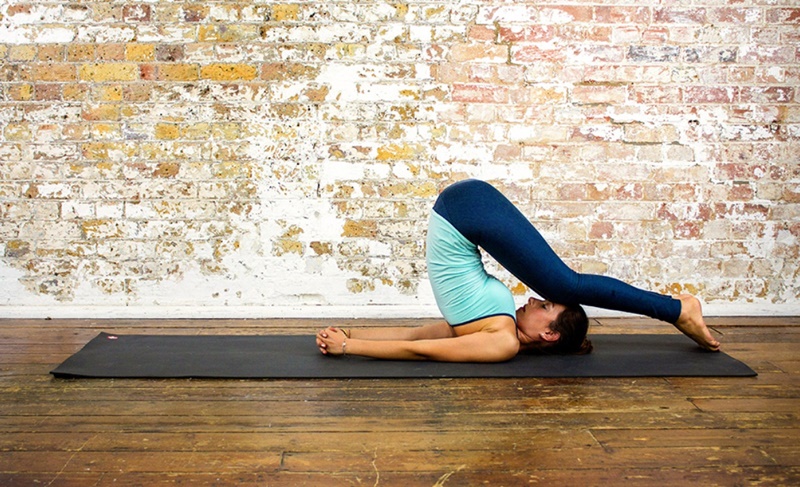
Plow pose plows into your mind and body and deeply revitalizes you. It gears up your body and strengthens it by relaxing, calming and soothing the nervous system which in turn has great effects on your skin making it tight, bright and smooth.
Step by step to Plow Pose
- Lie down on your back and keep your arms right beside your body.
- Let your palms face downwards.
- Breathe in and lift your feet placing them at 90 degree angle using the support of your hips and hands.
- Now move your foot towards your head.
- Remain in this position for a minute and keep breathing.
- Now gradually bring your legs to their original position.
- Do the same with the other leg.
Warning
This pose is not meant for those with back and spinal problems. It is best for ladies to avoid it if they are on their period or pregnant.
6. The Sage pose
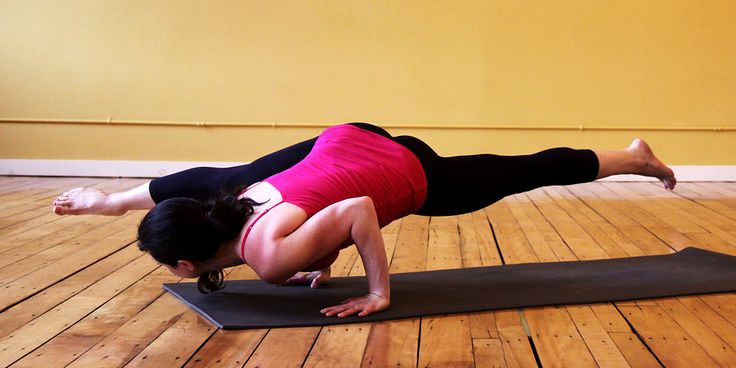
The sage pose (Marichyasana) is well known for improved blood circulation to the internal organs particularly the abdominal organs. It also massages these organs and detoxifies your body which gives you a brighter complexion. It acts as a great stress buster which is a must ticket to good wrinkle free skin
Step by step to sage pose
- Keep yourself in a sitting position, stretch out your legs and keep your spine in an upright position.
- Fold your right leg and bring the knees closer to your chest.
- Let the toes of your left foot face the ceiling.
- Keeping your back upright, stretch out both your arms.
- Breathe in move your upper body towards the left.
- Now wrap your arms around the right knee that’s folded and hold it tight.
- Inhale and exhale with your spine upright, your chest broad and head towards the left.
- Remain in the position for a minute then come back to the original position.
- Then do the same with your left leg.
Warning
Don’t practice this pose if you have a migraine or headaches record. Also, avoid it if you have either high or low blood pressure, insomnia or have gone through a serious back injury.
5. Camel Pose or Ustrasana
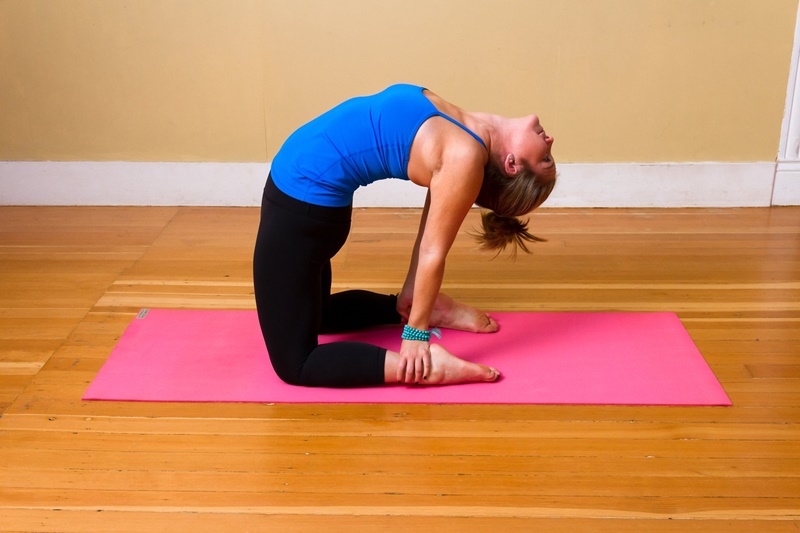
Camel pose involves extreme back bend which stretches out your rib cage and expands your lungs. This allows you to breathe in deeply and provide your body with more oxygen. When you bend backwards with your head towards the floor, this rushes in more blood to your brain, stimulating more blood flow to the brain. It balances out your hormone and alleviates stress as well. This pose will give you not only healthy skin but also healthy hairs.
Step by step to Camel Pose:
- Simply kneel down on the floor and remain upright.
- Move your hands from the side of your body toward the back at your heels. Do this one by one with each hand
- Open up your chest and take hold of your heels.
- Push your hips forward and let your thighs remain at 90 degree angle with the floor.
- Keep your head back.
- Remain in this pose for up to a minute and breathe.
Warning
A straight NO to this pose if you are a patient of high or low blood pressure, have migraine history, suffer from insomnia, have a neck or low back injury. Do not force any pose on your body. Do what is conveniently doable for you. It is advisable to practice yoga under a yoga professional before doing it yourself.
4. Yogit Facial Massage
Yoga yogit facial massage features the perfect moves to keep your skin wrinkle free and keep skin aging signs at bay. Yogit is a yoga for face that helps to trigger facial nerves that bestow you with the royal glow of skin. Yogit also helps to keep shed away all your stress and keep you relaxed. What can age you before time more than stress!
Step by step to Yogit Facial massage
- Begin with massaging your forehead with a light hand with your fingers.
- Start off with the middle of the temple of your forehead.
- Lightly pinch your brows with a firm hand 3 times.
- Now massage the area around your eyes in circles to ward off the wrinkles that appear at the corner of your eye also known as crows feet.
- Now massage your cheeks gently in circular motion.
- Now look up and massage your neck which happens to be the most ignored part.
- Make sure you don’t use massage oil.
3. Cobra Pose or Bhujangasana
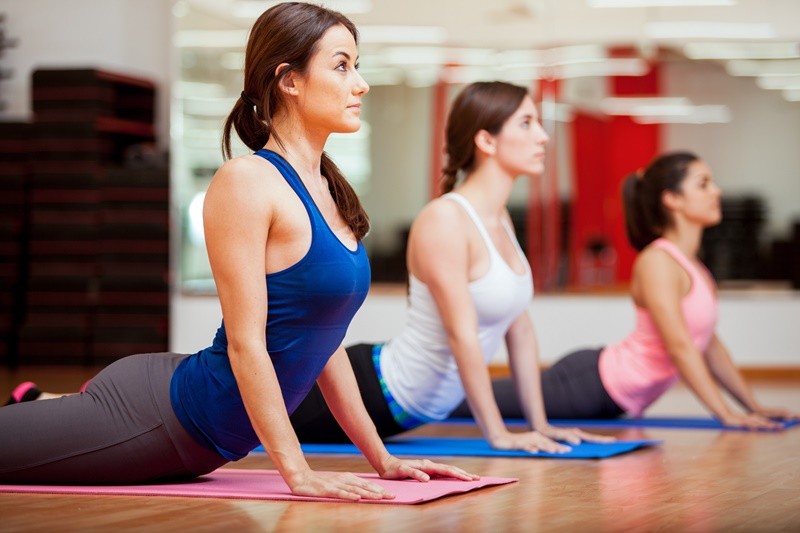
Cobra pose will reinvigorate and boost your energy by relieving the body of exhaustion, tension and stress. It does so by expanding your chest which opens up your lungs. This allows the body to supply more oxygen and get rid of all the toxins from your body. Together, all this will help to give you a wrinkle free and a smooth healthy skin.
Step by step to cobra pose
- Lie down on your belly and let the forehead along with your toes touch the floor.
- Put your hands right below your shoulders.
- With the support of your hand (put equal pressure on both hands), lift up your head, chest and abdomen but keep your belly button on the ground.
- Inhale deeply while you make this move and arch your spine.
- Try to keep your arms straight by curving your back but do so as much as you can easily do.
- Move your head back and look towards the ceiling.
Let your shoulders be relaxed. - Remain in this pose for up to a minute. Do not strain yourself too much. Only do what you can do conveniently.
- Now gradually allow your abdomen, chest and head touch the floor. Exhale while you do this.
Warning
Make sure you don’t arch your lower back and neck too much. Don’t practice this pose if you have joint problems, fractured hand or limbs and if you happen to be pregnant. In case of spinal injuries, perform this pose under a yoga expert.
2. Forward bend pose or Uttanasana
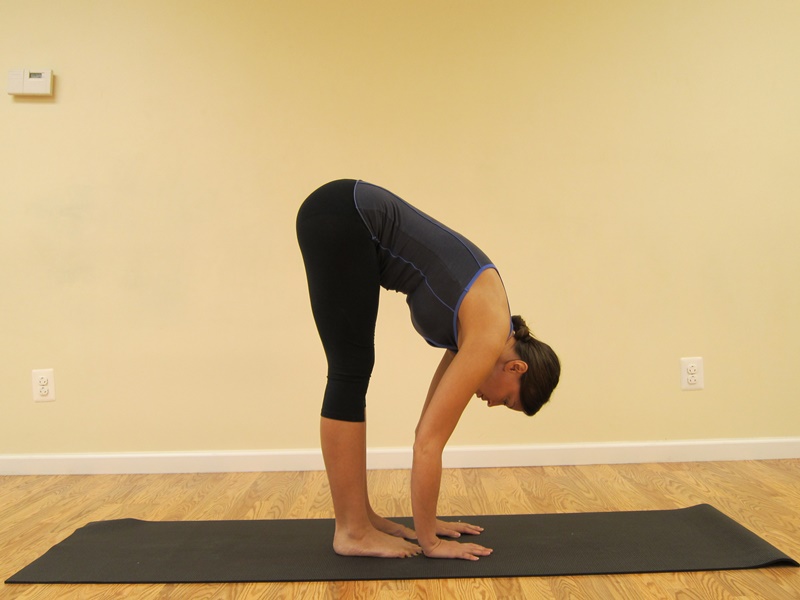
The forward bend pose can easily be performed by beginners and is an amazing yoga pose for healthy skin. It facilitates flow of blood towards the face and becomes a great yoga pose for smooth and glowing skin. What this pose does is increase the amount of oxygen supplied to the cells of your skin and provides them with ample nutrients. It fixes the damage done by free radicals and promotes regeneration of skin cells. It also provides the added benefit of reducing your tummy.
Step by Step to Forward Bend Pose
- Stand with your spine erect, arms raised above your head, and feet together.
- Now bend forward and try to touch the floor with your hands and keep your legs straight at the same time.
- Hold this pose for up to a minute and focus on your breathing.
- Then slowly come back to your original standing position.
Warning
Do not practice this pose if you have neck or lower back injuries.
1. Mountain pose or Tadasana
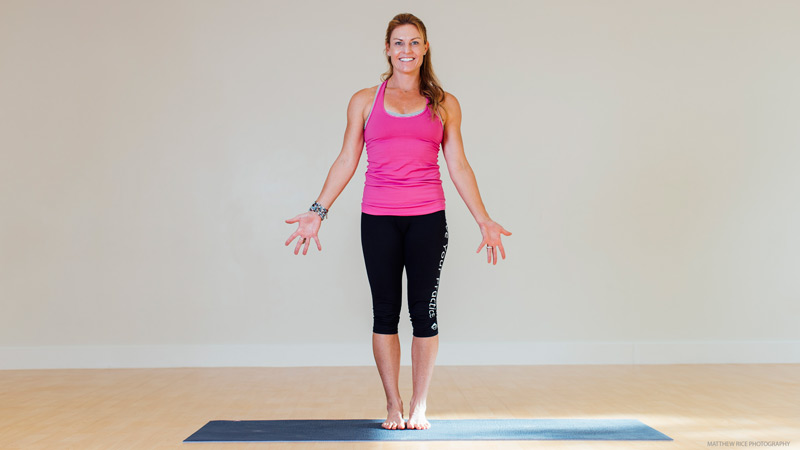
This is yet another simple but highly effective pose which serves as a face tightening exercise that even beginners can easily perform. Mountain pose is a standing pose that focuses on rhythmic and deep breathing which is bound to give you smooth and youthful skin. When you take deep breaths you help to provide your body with more oxygen that in turn expels out harmful toxins that deteriorate your skin.
Step by step to Mountain Pose
- Stand straight with the heel of your feet an inch or two apart and the Big toes touching each other.
- Now raise your hand in the form of Namaste.
- Bend your back and gradually release it.
- Let your head remain straight looking ahead.
- Hold this pose for up to a minute and focus on your breathing throughout.
Warning
Don’t practice this yoga pose if you suffer from low blood pressure, insomnia or head ache.
Wrap Up!
Yoga has been a secret of many people who look young despite their age. The major reason is that yoga helps to shed away all the stress that makes you look older than you really are especially your skin. We all have a skin care regime. Let’s take a step forward and add yoga to it too and you won’t even need those expensive creams and treatments that you think about.
References
Forward Bend Yoga Poses
Enhance your Beauty with Yoga
9 Yoga Poses That Promise Beautiful And Glowing Skin
Featured Image: wrinklefreecalgary

